
Start with self-serve radius targeting inside Google Ads or Meta, not a managed programmatic contract.
Here’s your move this week:
- Budget check: Set aside $300 to $500 for a two-week test. That’s enough to learn something real.
- One-week MVP: Build one geofence around your own location plus one 0.5 mile fence around a lunchtime office cluster, then launch a single offer.
Key Takeaways
Geofencing for restaurants works best when operators start with self-serve radius targeting, tie offers to specific dayparts, and close the attribution loop through POS and loyalty data.
| Point | Details |
|---|---|
| Start self-serve first | Test radius targeting in Google Ads or Meta before committing to programmatic minimums. |
| Tune creative by daypart | Breakfast, lunch, and dinner offers outperform one generic ad running all day. |
| Track CPIC, not impressions | Use Cost Per Incremental Cover against POS redemptions to prove real ROI. |
| Build in privacy guardrails | Cap frequency and disclose targeted advertising per FTC guidance to avoid alienating customers. |
| Scale with a managed partner | Ionhospitality builds daypart creative, POS integration, and attribution reporting for multi-unit or complex rollouts. |
Table of Contents
- What Is Geofencing for Restaurants, and Why Are Operators Using It?
- How Does Geofencing Actually Work?
- How Do You Set Up Your First Geofencing Campaign?
- How Do You Measure Geofencing Results and Attribution?
- What Does Geofencing Cost, and What Vendor Model Fits You?
- What Are the Privacy Rules for Location-Based Restaurant Ads?
- What Mistakes Kill Geofencing Performance?
- Why Does Daypart Timing Matter More Than Most Operators Think?
- An Agency View on When to Go Managed
- Get a Geofencing Strategy Built for Your Restaurant
- Sources
What Is Geofencing for Restaurants, and Why Are Operators Using It?
Geofencing draws a virtual boundary around a location, then triggers an ad, push notification, or text the moment a phone crosses into it. For restaurants, that boundary might sit around your own dining room, a competitor’s drive-thru, or an office park three blocks away. The tactic works because it collapses the gap between “I’m hungry” and “I’m ordering” down to a walk or a five-minute drive.
The payoff shows up in three places: more walk-ins, more mobile orders, and tighter kitchen prep timing when geofencing automates arrival-based workflows like order-ahead handoffs. Independent full-service restaurants tend to see the biggest lift from foot-traffic offers during slow dayparts. Fast casual and QSR concepts lean harder into app-order triggers and pickup automation. Destination fine dining uses geofencing differently, targeting drive-time radii of 5 to 10 miles for reservation pushes rather than impulse visits.
- Walk-ins during traditionally slow hours (2pm to 5pm)
- Mobile app orders from nearby offices and residential zones
- Average ticket lift when offers are paired with loyalty history
- Reduced no-show rates on curbside and pickup orders
An operator running geofenced pickup reminders alongside POS-integrated arrival detection can cut average wait times at the counter, because the kitchen starts prep the moment a regular customer’s phone enters the lot.
How Does Geofencing Actually Work?
Geofencing isn’t one technology. It’s a family of location signals stacked together, and which one you need depends on how tight your targeting has to be. Radius targeting draws a simple circle around a point. Polygon (or plot-line) targeting traces an exact shape, useful for excluding a competitor’s parking lot next door or fencing only the inbound lane of a shopping plaza.
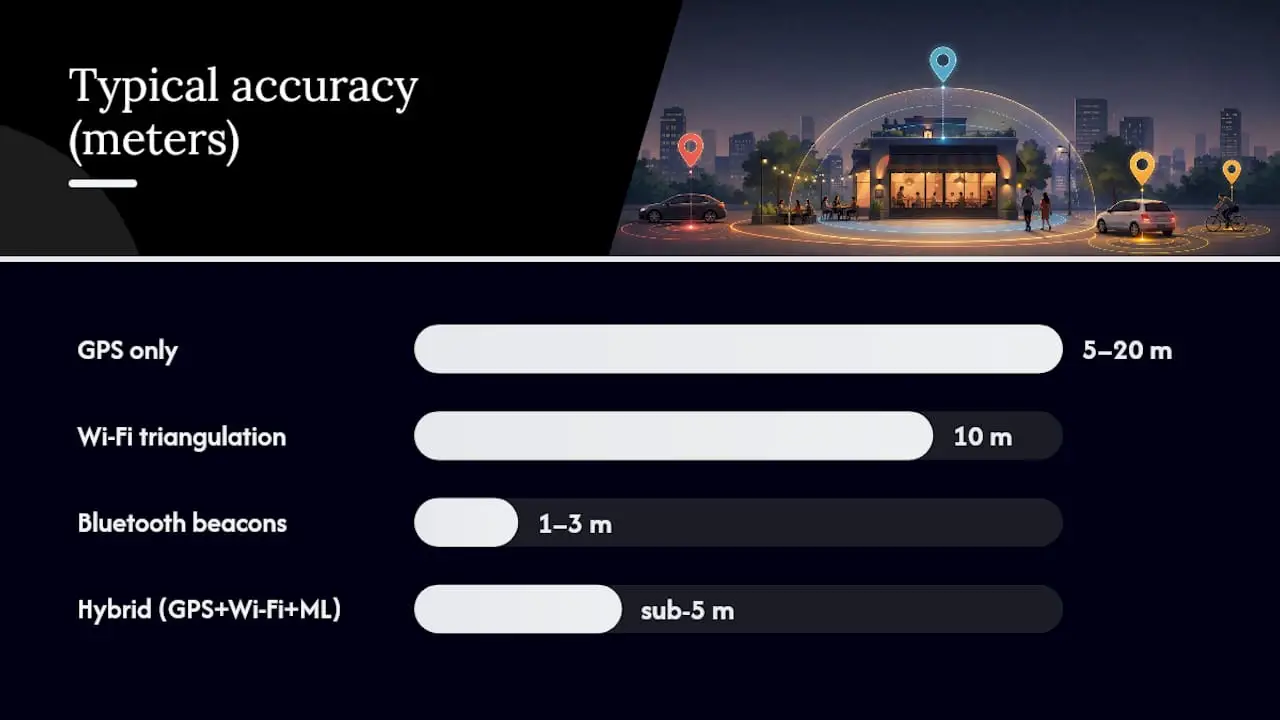
Signal sources vary in cost and precision. GPS works outdoors and across wide areas but drifts in cities. Wi-Fi triangulation and Bluetooth beacons tighten accuracy indoors and in dense corridors. IP-based targeting is the loosest, mostly useful for broad conquesting. Modern platforms blend these into hybrid stacks that reach sub-5-meter accuracy, using dwell time and movement speed to tell a walking customer from a passing car.
| Signal Type | Typical Accuracy | Best Use Case |
|---|---|---|
| GPS only | 5 to 20 meters | Suburban radius targeting, wide catchment areas |
| Wi-Fi triangulation | 10 meters | Dense downtown corridors, malls |
| Bluetooth beacons | 1 to 3 meters | In-store or near-entrance triggers |
| Hybrid (GPS + Wi-Fi + ML) | Sub-5 meters | Competitive conquesting, tight polygons |
How Do You Set Up Your First Geofencing Campaign?
Don’t overbuild this. Your first campaign should answer one question: does location-triggered marketing move the needle for your restaurant? Here’s the sequence that gets you a real answer in under a month.
- Define your goal and KPI. Pick one: incremental visits, app orders, or curbside conversions. Don’t try to measure all three on your first run.
- Build your creative and offer. Keep the call to action simple: “Show this text for a free appetizer, today only.” Never reference a competitor’s name or logo in the creative itself.
- Connect your integrations. Link the campaign to your mobile ordering flow, POS, and loyalty program so redemptions get tracked automatically.
- Run a 4-week arc. Week 1: soft launch and creative testing. Week 2 to 3: scale spend on the best-performing daypart. Week 4: pull data and decide whether to extend or pivot.
- Brief your kitchen and front-of-house staff on expected order volume spikes tied to the campaign windows, especially around lunch and dinner pushes.
Pro Tip: Build two or three creative packs before launch, one per daypart, and split-test them against each other rather than running one generic ad around the clock. Daypart-specific offers consistently outperform one-size-fits-all creative.
How Do You Measure Geofencing Results and Attribution?
Vanity metrics like impressions won’t tell you if geofencing paid for itself. Track visits, view-through conversions, coupon redemptions, app opens, mobile orders, and incremental covers, then close the loop against your POS and campaign tracking system so redemptions tie back to actual transactions.
- Visits: Confirmed foot traffic inside your geofence during the campaign window.
- Redemptions: Coupon or offer codes scanned at the POS.
- Incremental covers: Visits above your baseline traffic for that daypart and day of week.
- Cost Per Incremental Cover (CPIC): Total campaign spend divided by incremental covers.
Say you spend $600 over two weeks and your POS shows 180 redemptions above baseline. That’s a $3.33 CPIC, comfortably inside the $1.50 to $4.00 per-visit range reported for well-targeted geofencing campaigns. Standard digital channels often run $5 to $12 per visit, which is why proximity-based targeting tends to outperform broad social or display spend on a pure cost basis. Give any test at least two weeks before drawing conclusions. One slow Tuesday can skew a three-day sample badly.
What Does Geofencing Cost, and What Vendor Model Fits You?
Pricing shapes vary more than most operators expect. Self-serve platforms bill by CPM or CPV with no real floor, letting you test with a few hundred dollars. Managed programmatic services add plot-line accuracy and cross-channel retargeting, but they typically carry $2,500 or higher monthly minimums plus a management fee.
Most independent restaurants should start self-serve inside Google Ads and Meta, then graduate to programmatic once volume or multi-location complexity justifies the spend. Before signing with any vendor, ask these questions:
- Who owns the location data, and can I export it if I leave?
- How do you attribute a visit back to a specific ad exposure?
- What’s the minimum polygon size you support, and how accurate is it in my market?
- What’s the monthly minimum, and is there a contract lock-in?
- Can you integrate directly with my POS and loyalty platform?
What Are the Privacy Rules for Location-Based Restaurant Ads?
Location data is sensitive, and customers notice when marketing feels invasive. The FTC’s guidance on online advertising disclosures requires clear, prominent disclosure whenever targeted advertising practices are in play, including location-based triggers.
Build guardrails into every campaign rather than treating compliance as an afterthought:
- Cap message frequency so the same customer doesn’t get hit three times a day.
- Use opt-in channels (app permissions, SMS consent) rather than assuming blanket access.
- Keep creative free of competitor trademarks or implied affiliation, even in conquesting campaigns.
- Document your data retention policy and make privacy language visible in your app or loyalty sign-up.
The line between “helpful reminder” and “creepy stalker ad” usually comes down to frequency and tone. One well-timed offer feels like a nice surprise. Three a day feels like surveillance.
What Mistakes Kill Geofencing Performance?
The fastest way to waste a geofencing budget is treating every hour of the day the same way. Tighten your radius in dense urban corridors where foot traffic is high but attention spans are short. Test dayparts independently instead of assuming your lunch offer works at dinner. Personalize offers using loyalty data whenever you can, since a regular customer responds differently than a first-timer.
Avoid blasting identical creative around the clock. Don’t lean on aggressive price attacks when conquesting near competitors. Steady, subtle messaging like speed-of-service reminders performs better than discount wars and draws less backlash. Ignoring location-accuracy limits is another common trap. GPS-only targeting in a dense downtown corridor can fire your ad three blocks off target.
- Rotate creative packs weekly to avoid offer fatigue among repeat customers.
- Coordinate with kitchen staff before launching any campaign expected to spike order volume by more than 20%.
Pro Tip: Keep a shared calendar between marketing and the kitchen showing exactly when each geofence campaign goes live, so your team isn’t caught flat-footed by a lunch rush that started with a text message.
Why Does Daypart Timing Matter More Than Most Operators Think?
Generic, always-on creative leaves real ROI on the table. Restaurants that tailor offers to breakfast, lunch, snack, and dinner windows see meaningfully stronger return on ad spend than those running one message all day. The mechanism is simple: proximity plus timing collapses the decision window. A lunch offer fired at 11:45am to someone inside a half-mile radius competes with almost nothing else in that person’s head at that moment.
| Approach | Creative Style | Relative Performance |
|---|---|---|
| Generic always-on creative | Single offer, all dayparts | Baseline |
| Daypart-optimized creative | Breakfast, lunch, dinner variants | Higher ROAS |
A simple test: run your current always-on ad for two weeks, then switch to three daypart-specific variants for the following two weeks, holding budget constant. Compare CPIC between the two periods using the same POS attribution method.
An Agency View on When to Go Managed
Self-serve works fine for a single location testing the waters. Once you’re running multiple units, juggling event-driven promotions, or trying to close the attribution loop across POS and loyalty systems, the complexity outpaces what one manager can babysit between shifts. That’s when Ionhospitality typically steps in with a managed engagement: creative production, campaign operations, POS integration, and reporting built specifically for restaurant clients. The goal stays the same whether you’re doing it yourself or handing it off: measurable visits, tracked against a budget you control.
Get a Geofencing Strategy Built for Your Restaurant
Running geofencing yourself works, until you’re managing five daypart creative packs, three integrations, and a spreadsheet of redemption codes on top of actually running your restaurant. Ionhospitality handles the geo-targeted advertising, creative production, and POS/loyalty attribution so you get the visit data without the operational drag, and unlike traditional agencies charging commission on every online order, Ionhospitality takes 0% commission on direct orders your campaigns generate.
Our team builds the geo-targeted advertising campaigns around your actual traffic patterns, not a generic template, then reports back on real covers and redemptions tied to your POS. If you’re deciding whether to run this in-house or hand it off, the fastest way to find out is a discovery call where we walk through your current setup and map out what a managed rollout would look like for your specific concept.
Sources
For deeper dives into specific pieces of this rollout, these sources cover the technical, legal, and cost angles referenced throughout this guide.
- Geofencing in QSR: How Location-Based Marketing Drives Foot Traffic in 2026 | QSR Pro
- Why geofencing is mission-critical for QSRs – Radar
- FTC staff revises online advertising disclosure guidelines

Add a Comment